Chipping on Gourds using a Gouge
|
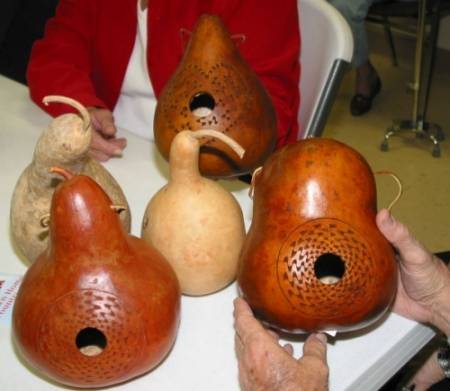
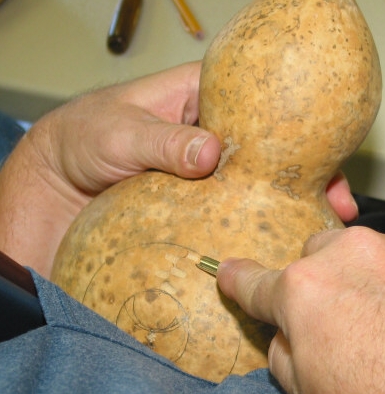
Very attractive gourd art can be created by using wood gouges. Eugene Endicott (above) taught a class to 16 eager Gourders in the TGS Southeast Patch on Saturday, January 8, 2005. Gene has many years of experience in this technique with photos of his work appearing in various books on gourd carving and sculpting. |
|

|
Safety tip: Supplies:
|
|
Choosing the gourd
A simple beginning design is a birdhouse, starting with a thick gourd, laying out the design in a circle, with a hole at the center. If a hole is not planned, then that circle can be a decorative focal point. A thick gourd is needed so the gouge is less likely to punch through the gourd. Gene said that Apache Dipper gourds are great, with flat bottoms, but they are not usually available. Often thicker gourds come from California or Arizona, but they also come from various growers who fertilize properly and when weather conditions are favorable.
Choosing the gouge
Good quality gouges should be used for safety and for easier and precise cutting. A proper gouge for this work is called a palm gouge.
Woodcraft stores
and other stores handling wood carving tools should have a selection. Different
sizes are useful for the professional, but for learning, one 1/4 inch gouge works
well. Woodcraft puts its name on Ramelson
products which are very good, and
Woodcraft also sells Flexcut gouges.
A number is shown with the fractional size to indicate the shape of the cutting edge. For Ramelson the number is 14 and
in the Flexcut, the number is 11, both giving a deep U shape. The smaller the
number, the more open the cutting edge, with a 2 or 3 nearly straight on the
cutting edge. The gouge I purchased cost slightly over $20 including tax.
Woodcraft has a retail store in Houston, Texas.
An Arkansas stone (or equivalent) with different size grooves is used for
sharpening the cutting edge evenly.
You can also order gouges on the TurtleFeathers web-site.
For more details on purchasing carving tools, check this article from Happy DIY Home.
Design
|
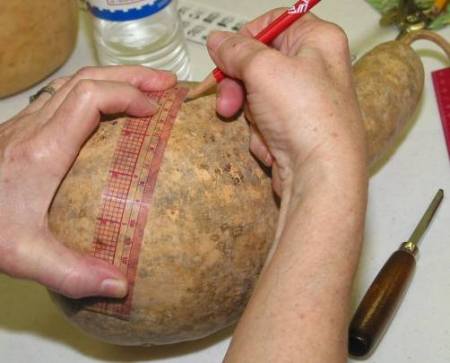
A compass is used to draw a large circle on the side of the gourd. Center your circle on the lower part
of your gourd to avoid water accumulation. A quarter (one inch diameter) can be placed over the center point,
drawing a smaller circle at the center of the larger one: This is your hole, you will do your design around it. Divide the large circle in half, then quarters, and keep dividing into 16 equal sections for a 4 inch diameter circle or 20 sections for a 5 inch circle. Using the compass, make additional circles inside the outer circle, each 1/2 inch smaller in diameter.
|
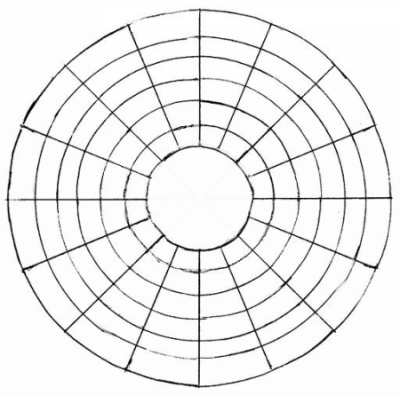
A tip from Clara Willibey: You can also use a protractor to help you make homogeneous sections. Decide how many sections you want in the circle (an even number). You have 360 degrees in a circle. For eight spokes, divide 360 by 8 = 45 degrees. Take the protractor and mark 0, 45, 90, and 135 degrees. Draw those spokes, continuing through the center to the opposite side of the circle. If you want 10 sections, mark 0, 36, 72, 108, and 144 degrees. |
Chipping
|
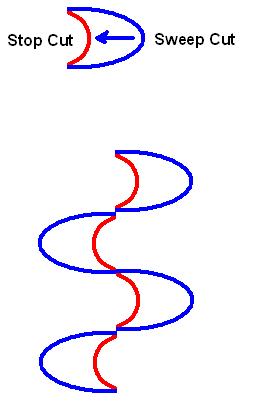
Each chip takes 2 cuts. The first, called the stop cut is a
cut with the gouge pushed perpendicular into the gourd surface. The result is a
U shape cut, in red in the drawing. The second cut called the sweep cut, starts back from the bottom of
the U cut a minimum of 1/4 inch up to nearly 1/2 inch and slide the gouge with a
slight side-to-side motion, going deeper as you approach the stop cut.
This cut is shown in blue in the drawing, the arrow showing the motion
of your gouge.
|
Upon reaching the stop cut, the chip will be loose and easily falls out. Do not pry up at this point, or you might loosen more than the chip you want to remove. |
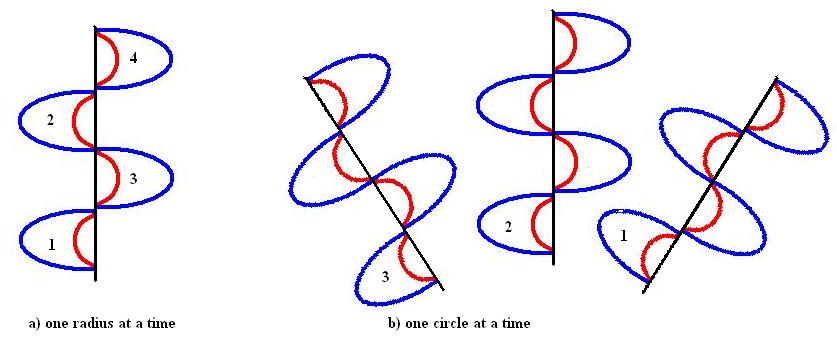
Start chipping near the inner circle. You can make your cuts in the order you wish but for any row, you try to make the chip cuts uniform:
- one radius at a time: Skip every other section then turn the gourd and repeat. (a)
- one circle at a time: Do one row then turn the gourd to do the next. (b) This may help you make uniform cuts
- one cut at a time: You may wish to make all the stop cuts on a circle, then make the second chipping cut to finish each chip around the circle. Next, turn the gourd to make the chips in the opposite direction on the second row.
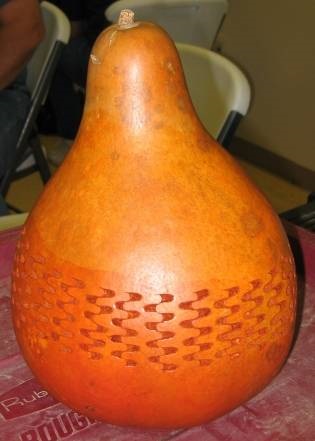
The stop cuts along each 'spoke' will interlock and the chip pattern appears wavy caused by reversing the direction of the cuts in alternate rows (see photos).
|
|
By replicating the first circle design around the gourd, you can cover most of the gourd with chips. Measure the distance around the gourd. If, for instance, the gourd is 30 inches around, you could place 6 circles with 5 inch diameters. Another design is simply drawing a line around the gourd and chipping all the way around, then reverse the gourd for the rows above and below it, covering as much of the gourd as you desire. |

Finish
The inner part of the gourd is exposed by gouging and takes
up more dye (Fiebing or equivalent) than on the gourd surface. This creates a
pleasing effect, enhancing the gouged areas. For indoor display a neutral color
of paste wax gives a pleasing look after the dye dries for a day or more.
If you wish to dye the gourd after chipping, be sure to completely erase all
pencil lines, because the pencil marks prevent the dye from reaching the gourd
surface. When applying dye use a shop style paper towel to apply and then wipe
off, leaving an even color. Let set for at least 30 minutes and make another dye
application. You can apply the same color twice, or try two different colors for
interesting effects, but practice on a gourd scrap first. Let dry for at least
24 hours, and then apply paste wax and buff (for displaying indoors). Do not use
coarse sandpaper on a gourd you plan to dye. It scratches the surface and absorbs the
dye faster than the surface.
David Blackwell has a very interesting display of his work on the internet where you can see the effect of different colors on carved gourds.
Note on bird houses
- No perch should be used because sparrows, grackles or crows will use the perch while eating eggs or pecking baby birds inside
- Use shellac to protect the finished product
- Drain holes in the bottom will prevent water accumulation inside