This class was taught by Susan Urban at our November 2012 meeting.
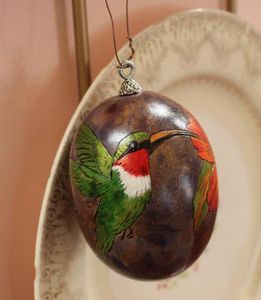
Hummingbird Ornament
Design by Susan Urban
Use the bigger egg shaped gourd ( from Wuertz Gourd Farm) for this project.
Gourd preparation
Clean the gourd: it can be lightly sanded using a very fine sandpaper in order to keep the skin on the gourd.
Attach a hanger: Remove the stem end of the gourd and sand even to insert a hanger. A base metal jewelry cap finding makes
a nice hanger but you can use any type hanger you may have. The holes in the caps may need to be drilled bigger to fit in the eye screwsm
the eye screws are zinc 214 x 13/16 H#35229 (long and thin). Pre-drill the area to insert the hanger, if not the gourd may crack in two places. Attach a piece of wire to help hold onto the ornament while working on it.
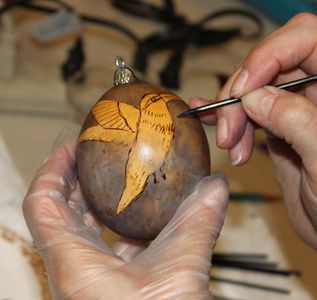
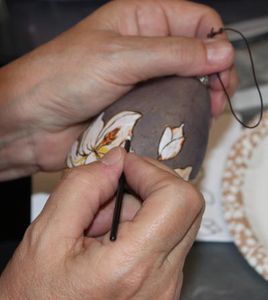
Transfer the design: You can get the design here.
Cut out the hummingbird and using a piece of tracing paper
under the design tape it down by shaping it to the gourd. It may be a little tricky: start
by taping it on the top and then the bottom, then work it around, trace it on.
Cut out the flower and apply in close proximity to the beak of the hummingbird.
Welburn sells a stick-n-burn product that is put into a printer and artwork can be copied onto it then wood burned on.
Fast and easy but it's not as cost effective.
Woodburn the design on adding as much detail as you want.Clean well with a wipe.
Painting
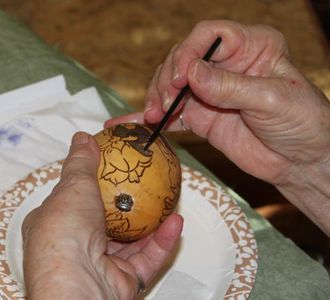
For this lesson we will use Welburn gourd products: Welburn Gourd Master ink dyes, transparent acrylics, and metallic inks.
For application we will be using fine tip applicators. Felt pads (I buy white sheets from HL and cut them into small pieces).
One small flat brush for finishing touches.
First apply the gourd conditioner Formula 49 (can also be used to remove dyes). Apply very sparingly with a felt pad
in small areas and use the heat embossing tool to heat set (dry). Be careful not to get too hot or close, it will undo the conditioner.
TIP: If any of the dyes applied look wet it probably is so dry or dab with tissue and heat set again.
For the background on the gourd using a fine tip applicator paint either the blue denim ink dye or the black ink dye.
Apply in small areas dabbed with tissue or paper towels (can add designs) and heat set.
TIP: Don't apply too heavy and dab with Kleenex before drying, with these dyes it is better to add in layers. It is a process of layering and drying.
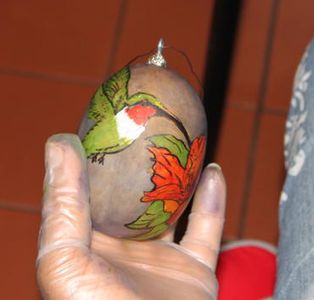
Hibiscus: with fine tip applicator paint the flower with classic yellow ink dye.
After drying use cherry red ink dye in the folds of the flowers, blending with tissue (no hard lines).
Leave lights hitting the petals. Use the deep red dye in the center of the flower (avoid stem)
and in a few folds (not too much) leave lights.
Paint the cherry red on the throat of the hummer area directly under the beak.
Save the area under that for the white to be applied last.
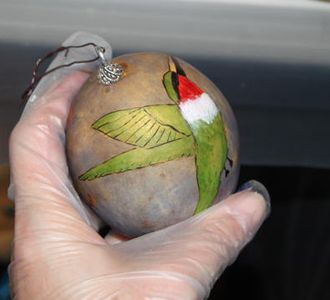
Apply the light colors of green (classic green ink dye) on the hummingbird and then to the leaves.
Dab with tissue to add lights across the top of wings, back and head and leaves.
Beak and eye area: using the transparent black paint the bottom of the beak and the piece around the eye and the eye.
Dab the eye to lighten.
Using the white ink dye, paint the throat under the red area, be careful not to get into the red or you will have a pink throat.
TIP: Lights: always dab in areas to add lights for more interest!
Adding highlights:
using the Sunshine Gold metallic ink: use a small flat brush and a small amount of ink (dry brush)
add highlights to petals. Be careful you can get too much and cover your darks.
Less is more. Paint the stem of flower and the bulb and the top of the beak.
Using the Gecko Green metallic ink: dry brush the leaves. I like to use the fine tip applicator to add feathers on the top of the hummer head and some on the wings and body.
Using the Sparkle White: highlight white throat area.
Using Christmas Red: highlight throat and center of flower.
Using the basic white:and the tip of the fine tip applicator put a dot on the hummers eye. Dry it or you will lose it!
TIP: The metallic paints need to be heat set also but be more patient as it
takes a little more time and try not to get too close when drying any of the
paints (about '' away).
Adding some black areas for interest , using the fine tip and the black. You may add a few lines (maybe in areas covered by paint that was originally burned ) or other areas to add depth.
Do not outline!!!! Only use light strokes and not too many.
Finishing: let it sit and cure for at least 6 hours, better overnight. Spray with the Deft satin finish in light strokes and let it dry completely before you spray again. These small round shapes are easy to overspray causing tacky spots that you can't get rid of.
