Macrame Hammock
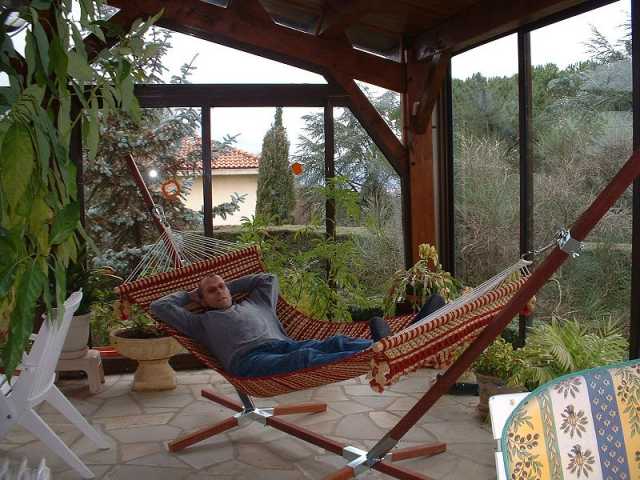
I created this hammock as a Christmas present for my parents. I made my knots very close to each other to have a fabric-like hammock,
thus there are more than 6000 knots. It took me a good month.
I used polypropylene Bonnie-Braid Cords, "wine" and
"harvest", 6mm, 778 yards in each color. You can purchase them at
Carol's
rug. It's a little rough to the touch and expensive
but there are more colors to choose from than with nylon seine twine from a
boating store. The knots used are: clew knot (the triangular knot below the rings), square knots (for the hammock itself), Crown knots (for the triangles and the fringes), Pan-Chan knots for the fancy looking butterflies.
Supplies
- 778 yards of 6mm "wine" Bonnie Braid polypropylene cord
- 778 yards of 6mm "harvest" Bonnie Braid polypropylene cord
- white nylon seine twine for the 2 clew knots
- 2 3" welded metal rings
- 2 dowel large enough to support your weight
Step 1: Cut the cords
The hammock is a rectangle made with 33 columns of alternating square knots, a
column is made with 1 wine, 2 harvest and 1 wine cords (4 cords).
You will need to cut the cords in the following manner:
- 66x 424 inches wine,
- 66x 424 inches harvest,
- 22 white cords long enough for the clew knots (practice first, to
get an idea of the length you want)
PLEASE NOTE: When cutting the cords, the ends have a tendency
to fray. A quick way to avoid this is to lightly burn the ends together with a lighter, keeping an old
rag or towel handy to clean the black "goo" from the ends.
Make a ball with each cord that you secure with a rubber band.
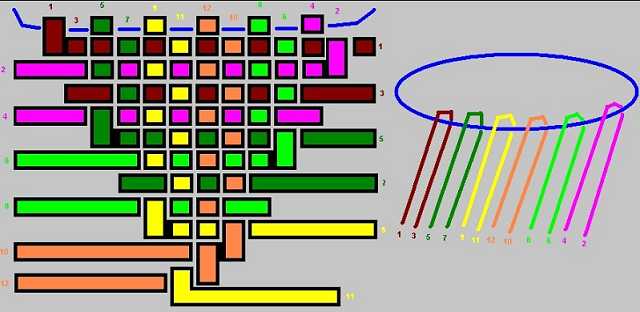
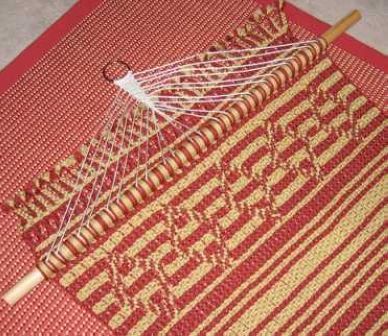
Step 2: Prepare the clew knots.
Attach 11 white cords to the ring leaving 22 cords hanging and begin the clew knot
as described in the picture below. Once you get the trick it's pretty simple, just weave your cords (above-under-above-under...) as
numbered in the drawing, once you've weaved with a cord it's no longer used in the knot:
Drill 22 holes in the dowels, at 3,3,6,3,6.......6,3,6,3,3 inches intervals, the
whites cords will go through them.
Attach the colored cords and the 22 white cords to the first dowels so that you have a pattern like this:

Leave enough colored cords hanging on the outside to make a fringe later.
Attach the ring to a door knob. Lightly secure the white cords with an overhand knot
just below the dowels. Once all the knots are made,
adjust the balance of the dowel by tightening and loosening the knots. (You may
have to do this again when your hammock is finishes so do not tighten the knots
too much).
Drill the second dowel, make the second clew knot, and put it aside.
The colored cords will be attached to it at the end.
Step 3: Knot the rectangle
- 33 columns = groups of 4 cords, wine-harvest-harvest-wine
- as many rows as required to fit a normal size adult.

|
Use alternate square knots to create lines of different thickness and color.
Since the knots are tight you can hang the hammock vertically when you knot, it
will be easier to manage.
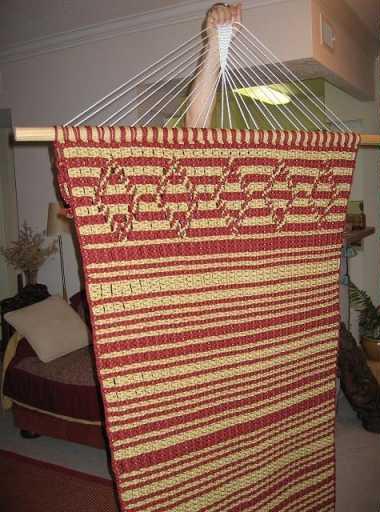
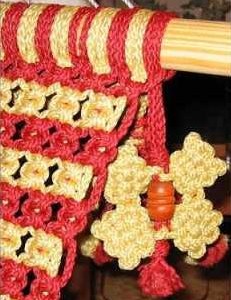
At the end of the hammock I decided to make a special pattern that would symbolize the place of the head. This pattern consists of 5 triangles made with
Crown knots instead of square knots. It's easier to do these knots at the end,
because the cords are shorter and you do not have to handle big balls of cords.
See picture below, note that I still have a lot of cord, that's because I
measured the cords longer than necessary to be certain that I'll not fall short
at the end of all this work...I can always find a use for the scraps (plant
hangers, small rugs, etc.)
Once you have ~2 meters of rows you can attach the cords to the second dowel, the same way you attached them to the first.
|
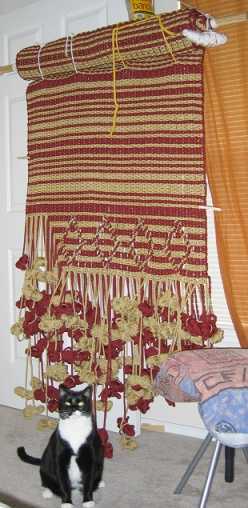
Step 5: Fringes
 |
Begin the 2 fringes, using any type of knots. I used a mixture of crown knots and square knots.
At each corner I added a kind of butterfly made of 4 Pan-Chan knots. I took this design from a very good book: "Chinese
Knotting", by Lydia Chen, you can find it on Amazon, Borders, etc.
|