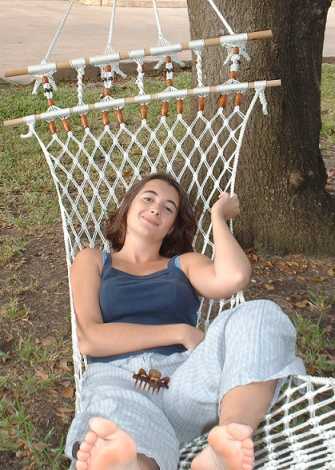
What you see in the pictures isn't exactly what is described below. I added my own creative touch : a different central pattern, beads, a different fringe pattern, 2 good-luck knots on one side.
Hammock

To order low-cost white nylon seine twine from an online boating store (cheapest way, holds up quite nicely), call 1-888-674-7638 and ask for #60 seine twine in a case of 12 spools for $48.48 (295 ft/spool), or order by the spool (1 lb, 295 ft) for $4.36.At about 96 yards per spool, you will need at least 6 or 7 spools. Cotton seine twine, #72 (which is only 175 lb test, but is much softer) is available for $54.84 by the case of 12 spools (215 ft/spool) or $4.98 per spool. This is the least expensive method I have found for purchasing large quantities of good-quality twine. If you want to use hemp, your hammock will easily cost over $200 to make.
Instructions for the different knots can be found on the web: http://www.elainecraft.com/instructions
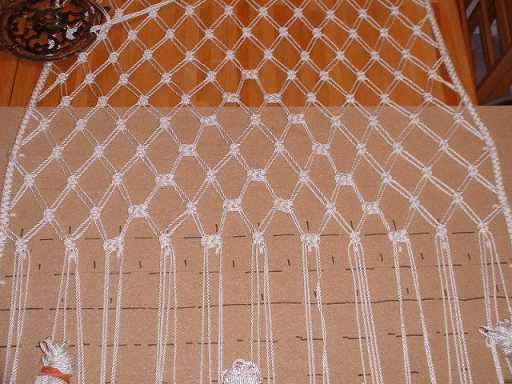
It helps to have a peg-board with 1-inch spaced pegs (or holes) when tying knots for the hammock to maintain spacing. DO NOT hang the hammock vertically when tying knots, as this will cause the sides to bow inwards.
Supplies
- 572 yards of #60 (558 lb. Test) or #72 (628 lb. Test) cotton or nylon seine twine.
- 2x 3" welded metal rings
- 2x 36" long dowels, 1" diameter
- 2x 36" long dowels, 3/4" diameter
 |
Step 1:You will need to cut the cords in the following manner:
PLEASE NOTE: When cutting the cords, the ends have a tendency to fray. A quick way to avoid this is to lightly burn the tri-twisted ends together with a lighter, keeping an old rag or towel handy to clean the black "goo" from the ends. Step 2:Onto the left side of one 3" ring, lark's head 3 of the 4-yard cords. In the middle, lark's head 6 of the 3 1/2-yard cords. Finally, lark's head 3 more of the 4-yard cords on the right side. This will leave you with 4 sets of 6 working cord lengths. With the 4-yard cords on each side, braid for 30", using 2 groups of 6 cords (need to braid with 2 cords instead of 1). With the middle cords, braid for 27", again using 2 groups of 6. When finished with each group, tie a single square knot to secure the braid. |
Step 3:
Double half hitch each braided cord to the 1" dowel, leaving the bottoms hanging and leaving a space between each of the strands you hitch to the dowel.Working from left to right, hitch cords between the braided cords as follows, leaving a 12" end on each cord:
- Double half hitch a 9 1/2-yard cord at the far left end.
- Also double half hitch one 9 1/2-yard cord between EACH of the hitched cords from the 30" braid.
- Quadruple half hitch 8 of the 9 1/2-yards cords in order along the empty dowel.
- Double half hitch 5 of the 9 1/2-yard cords, one between each strand of the 27" braid.
- Quadruple half hitch 6 of the 9 1/2-yard cords between the 2 sets of 27" braids.
- Double half hitch 5 of the 9 1/2-yard cords as in part 3.
- Quadruple half hitch 8 of the 9 1/2-yard cords between the 27" and 30" braids.
- Double half hitch 5 of the 9 1/2-yard cords, one between each cord from the 30" braid, and one more on the far right end.
Step 5:
The hitched cords to work with should total 44, and are numbered from the left:- With cords 1-4, tie 2 square knots, then tie two more with cords 5-8.
- Next, tie 2 square knots with cords 3-6 (middle), followed by 2 more square knots with 1-4 and two with 5-8.
- This should create an "X", and should be about 4" long. Repeat with cords 13-20, 25-32, and 37-44.
- Tie 4" of half twist knots with cords 9-12, 21-24, and 33-36
Step6:
 |
Quadruple half hitch all cords onto the 3/4" dowel, making sure to hitch
the correct cord (especially if having added the beads, cord numbering may
become easily skewed).
The braid shown on both sides of the dowel are added at a later step, but I have found that it makes it much easier to add them at this point to prevent inward bowing of the hammock. Please refer to Steps 14-16 for instructions on securing the braid. If done, you must wrap the outer strands around the braid when creating the outside square knots, and must secure the end of the braid with a heavy weight to make it taut. |
Step7:
Tie 27 rows of alternating square knots, covering 27".To do this, the middle of each knot will need to be at 1". You can use a ruler, or the markings on the peg-board that are evenly spaced. Alternatively, as seen in the picture above, you can tie TWO square knots in each row, spaced apart by 2". In this way, you will increase knot security and will only need to tie 12 rows before the next step instead of 27.
Step8:
 |
After completing the initial rows, a Josephine knot pattern will be done with some of the cords to create
a diamond shape in the center of the hammock. It's a very discrete design that can be
skipped if you want to finish faster.
Josephine ("figure-eight") knots will be tied with the following 2 sets of cords, while the rest of each row will be comprised of square knots:
|
|
 |